
반응형
안드로이드, 스마트폰, 어플리케이션, 전화걸기, 문자보내기, 구글맵,지도,검색
안드로이드로 만들어보는 나의 첫 APP

과제일시 : 2020-04-02
오늘은 안드로이드로 나만의 앱을 만들어 볼 예정이다, 일단 기능은 검색과 사이트 이동, 전화번호 입력, 문자 보내기, 사진보기 등 간단한 기능들을 넣으면서 익숙해져야 할 것 같다.

Source Code
* activity_main.xml
<?xml version="1.0" encoding="utf-8"?>
<androidx.constraintlayout.widget.ConstraintLayout xmlns:android="http://schemas.android.com/apk/res/android"
    xmlns:app="http://schemas.android.com/apk/res-auto"
    xmlns:tools="http://schemas.android.com/tools"
    android:layout_width="match_parent"
    android:layout_height="match_parent"
    tools:context=".MainActivity">

    <LinearLayout
        android:layout_width="match_parent"
        android:layout_height="match_parent"
        android:orientation="vertical">

        <Button
            android:id="@+id/btnDial"
            android:layout_width="match_parent"
            android:layout_height="wrap_content"
            android:text="전화걸기" />

        <Button
            android:id="@+id/btnWeb"
            android:layout_width="match_parent"
            android:layout_height="wrap_content"
            android:text="홈페이지열기" />
        <Button
            android:id="@+id/btnGoogle"
            android:layout_width="match_parent"
            android:layout_height="wrap_content"
            android:text="구글 맵열기" />
        <Button
            android:id="@+id/btnSearch"
            android:layout_width="match_parent"
            android:layout_height="wrap_content"
            android:text="구글 검색하기" />
        <Button
            android:id="@+id/btnSms"
            android:layout_width="match_parent"
            android:layout_height="wrap_content"
            android:text="문자보내기" />
        <Button
            android:id="@+id/btnPhoto"
            android:layout_width="match_parent"
            android:layout_height="wrap_content"
            android:text="사진 보기" />


    </LinearLayout>
</androidx.constraintlayout.widget.ConstraintLayout>

* MainActivity.java
package com.example.implicityintent;

import androidx.appcompat.app.AppCompatActivity;

import android.app.SearchManager;
import android.content.Intent;
import android.net.Uri;
import android.os.Bundle;
import android.view.View;
import android.widget.Button;

import java.io.File;

import static android.content.Intent.FLAG_ACTIVITY_NEW_TASK;

public class MainActivity extends AppCompatActivity {

    Button btnDial, btnGoogle, btnMap, btnSearch, btnSms, btnWeb, btnPhoto;
    @Override
    protected void onCreate(Bundle savedInstanceState) {
        super.onCreate(savedInstanceState);
        setContentView(R.layout.activity_main);

        btnDial = (Button)findViewById(R.id.btnDial);
            btnDial.setOnClickListener(new View.OnClickListener() {
            @Override
                    public void onClick(View v){
                Uri uri = Uri.parse("tel:01012345678");
                Intent telIntent = new Intent(Intent.ACTION_DIAL, uri);
                startActivity(telIntent);
            }
        });

        btnWeb = (Button)findViewById(R.id.btnWeb);
        btnWeb.setOnClickListener(new View.OnClickListener() {
            @Override
            public void onClick(View v){
                Uri uri = Uri.parse("http://odinbox.co.kr/");
                Intent httpIntent = new Intent(Intent.ACTION_VIEW, uri);
                startActivity(httpIntent);
            }
        });

        btnGoogle = (Button)findViewById(R.id.btnGoogle);
        btnGoogle.setOnClickListener(new View.OnClickListener() {
            @Override
            public void onClick(View v){
                Uri uri = Uri.parse("geo:35.359096, 129.360615");
                Intent geoIntent = new Intent(Intent.ACTION_VIEW, uri);
                startActivity(geoIntent);
            }
        });

        btnSms = (Button)findViewById(R.id.btnSms);
        btnSms.setOnClickListener(new View.OnClickListener() {
            @Override
            public void onClick(View v) {
                Intent smsIntent = new Intent(Intent.ACTION_VIEW);
                smsIntent.putExtra("sms_body", "혁신을 이룹니다, 오딘박스(http://odinbox.co.kr)");
                smsIntent.setType("vnd.android-dir/mms-sms");
                startActivity(smsIntent);
            }
        });

        btnSearch = (Button)findViewById(R.id.btnSearch);
        btnSearch.setOnClickListener(new View.OnClickListener() {
            @Override
            public void onClick(View v) {
                Intent smsIntent = new Intent(Intent.ACTION_WEB_SEARCH);
                smsIntent.putExtra(SearchManager.QUERY, "오딘박스");
                startActivity(smsIntent);
            }
        });

        btnPhoto = (Button)findViewById(R.id.btnPhoto);
        btnPhoto.setOnClickListener(new View.OnClickListener() {
            @Override
            public void onClick(View v) {

                //Intent intent = new Intent();
                //intent.setAction(Intent.ACTION_VIEW);
                //File imageFile = new File("sdcard/odinbox.jpg");
                //Uri uriFromImageFile = Uri.fromFile(imageFile);
                //intent.setDataAndType(uriFromImageFile, "image/*");

                //startActivity(intent);

                Intent photoIntent = new Intent(Intent.ACTION_VIEW);
                Uri uri = Uri.fromFile(new File("/images/odinbox.png"));
                photoIntent.setDataAndType(uri, "image/png");
                startActivity(photoIntent.addFlags(FLAG_ACTIVITY_NEW_TASK));
            }
        });

            }
        }

* AndroidManifest.xml
<?xml version="1.0" encoding="utf-8"?>
<manifest xmlns:android="http://schemas.android.com/apk/res/android"
    package="com.example.implicityintent">

    <application
        android:allowBackup="true"
        android:icon="@mipmap/ic_launcher"
        android:label="@string/app_name"
        android:roundIcon="@mipmap/ic_launcher_round"
        android:supportsRtl="true"
        android:theme="@style/AppTheme">
        <uses-library android:name="com.google.android.maps"></uses-library>
        <activity android:name=".MainActivity">
            <intent-filter>
                <action android:name="android.intent.action.MAIN" />

                <category android:name="android.intent.category.LAUNCHER" />
            </intent-filter>
        </activity>
    </application>
    <uses-permission android:name="android.permission.CALL_PHONE"></uses-permission>
    <uses-permission android:name="android.permission.INTERNET"></uses-permission>
    <uses-permission android:name="android.permission.ACCESS_FINE_LOCATION"></uses-permission>


</manifest>
이번 시간에는 권한을 이용해서 문자서비스나 구글 맵 서비스에 접근하는 방법에 대해서 알아보기도 했고, 보기에는 간단하지만 실제로 내가 직접 버튼을 누르면 내 번호로 전화할 수 있게 하는 방법도 알게 되었다.
      btnSms = (Button)findViewById(R.id.btnSms);
        btnSms.setOnClickListener(new View.OnClickListener() {
            @Override
            public void onClick(View v) {
                Intent smsIntent = new Intent(Intent.ACTION_VIEW);
                smsIntent.putExtra("sms_body", "혁신을 이룹니다, 오딘박스(http://odinbox.co.kr)");
                smsIntent.setType("vnd.android-dir/mms-sms");
                startActivity(smsIntent);
            }
        });
Intent를 smsIntent로 주고 액션을 넣어주었다, 그리고 들어갈 내용과 종류들을 입력하고 실행을 해보니 정말 정상적으로 잘 작동이되는 모습을 보여줬다. 이번에는 안드로이드 스튜디오에 내장된 에뮬레이터말고 나의 스마트폰을 연결하여, 직접 전화가 되는지 메세지가 가는지 확인했다.


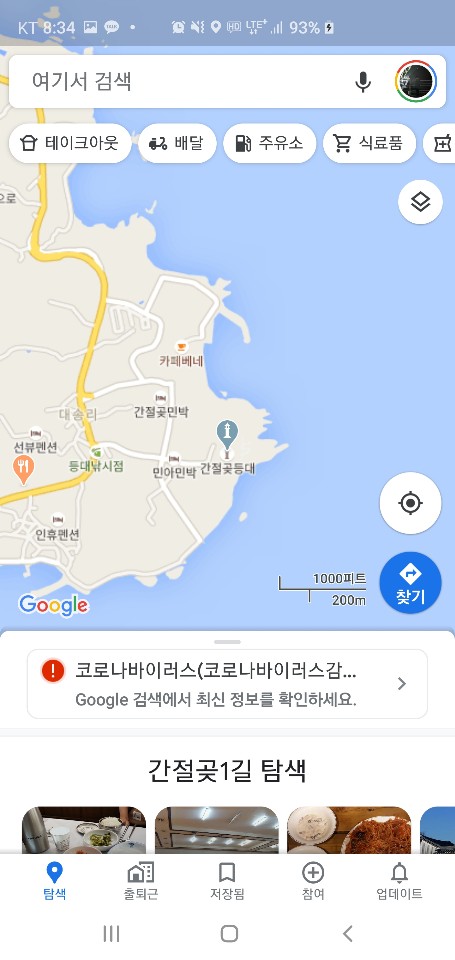

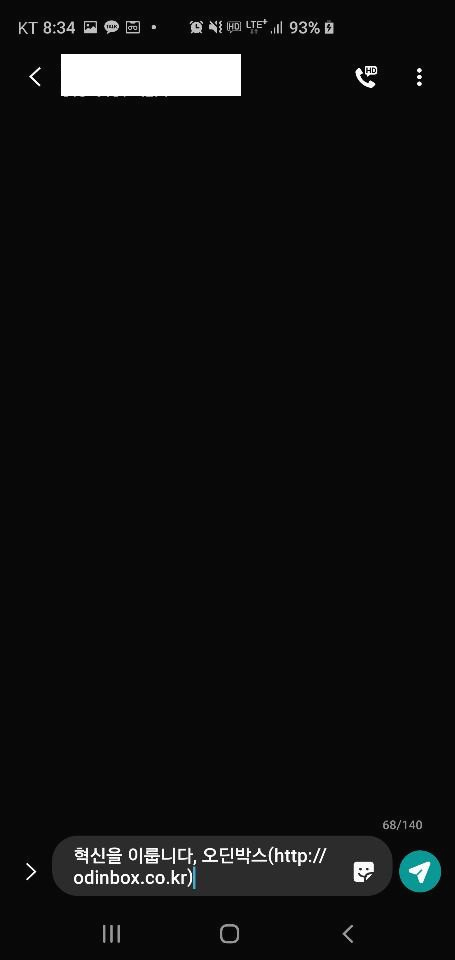

정상적인 동작이 되고 있다, Okay !
잘된다 ! :D
사진 관려하여, 몇가지 정보를 얻게 되었다.
       Button btnPhoto =(Button)findViewById(R.id.btnPhoto);
        btnPhoto.setOnClickListener(new View.OnClickListener() {
            @Override
            public void onClick(View v) {

                File file = new File("storage/emulated/0/DCIM/Camera/파일명.jpg");
                Uri path = Uri.fromFile(file);
                Intent intent = new Intent();
                intent.setDataAndType(path, "image/*");
                Intent intentGallery = new Intent(Intent.ACTION_PICK, android.provider.MediaStore.Images.Media.EXTERNAL_CONTENT_URI);
                startActivityForResult(Intent.createChooser(intent, "사진을 열 앱을 선택하세요"), 1);

            }
        });
추가를 이런식으로 해주면 정상적으로 작동이 된다! Okay!